| 1 |
- Begin, by raising
the front end of your car up and placing it on jack stands.
- Disconnect the
battery cables for safety.
- Drain the coolant
into some kind of container that you can cover,
so dirt will not fall in and/or animals will not drink from it.
- MAKE SURE NO
PETS ARE AROUND!!!
If dogs/cats/etc drink coolant they have a pretty good chance of dying
from it!. NO JOKE..
- Loosen up your
gas cap to relieve gas pressure from the fuel tank.
|
|
|
| 2 |
- Start disconnecting
all vacuum & radiator hoses/lines from the intake manifold
using the long needlenose pliers (real handy).
- Disconnect sensor
plugs, injector plugs (use a pick), etc., from the intake manifold and
throttlebody.
- Take the 12mm socket
+ ratchet and loosen up the fuel filter pressure-release bolt.
Some fuel will come out, so have a rag handy.
|
|
|
| 3 |
- Using a 10mm socket,
remove the black plastic wire harness cover from the fuel rail.
- Remove the vaccum
hoses from the FPR (fuel pressure regulator).
- Using the 10mm
socket again, carefully remove the nuts that hold the fuel rail down
to the intake manifold. These small screws tend to fall behind the engine
easily (i hate when that happens), so be careful!
- Carefully wiggle
the fuel rail off. The injectors will probably come off along w/the
rail. Try not to damage/rip the rubber o-rings that are on the injectors.
Also, try to not lose the round black grommets that hold the injectors
in place.
- Place the fuel
rail w/injectors still attached to it, somewhere out of the way, even
though the rail is still connected to the fuel filter line. Just get
it outta the way, near the battery somewhere.
|
 |
|
| 4 |
[Underside Manifold Bracket
Removal]
- Next, are the 12mm
intake manifold flange nuts & intake manifold underside-bracket
(if applicable).
- If this is a first-time-removal
of your GSR's intake manifold, you're in for a real treat! (see frustration
not @ bottom)
- Get under your
car so you can see the underside of the GSR manifold & underside-bracket.
- Use the ratchet
with a lengthly extention to reach the two 12mm bolts seen in
pics 1-3 below.
- Taking this bracket
off, will make the swap waaaay easier.
- While you're under
the car, disconnect any sensors that are still connected to the GSR
manifold, such as the IAB sensor (black-round canister mounted on the
underside of the GSR manifold)...
- Now, loosen up
and remove all of the 12mm flange nuts that are holding the GSR manifold
to the head.
|
|
|
| 5 |
[Swapping
of Parts]
- Once you're finished
removing all 12mm flange nuts, double check that all sensors, vaccum
lines, and any coolant lines are not connected to the manifold.
- If everything looks
go-to-go, carefully remove the GSR manifold. (PIC 4).
- Using a 12mm socket,
remove the TB from the GSR manifold and carefully peel the TB gasket
off using a razor blade to help.
- Next, you will
prep the Skunk2 manifold, by swapping over the GSR's fuel rail + TB
mounting posts and required sensors.
- You can start off
by removing the GSR's fuel rail mounting posts using two of the 10mm
fuel rail nuts.. (PIC 5)
- Next are the throttlebody
posts.
Remove & apply these posts using the same technique as used on the
fuel rail posts.
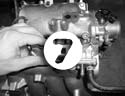
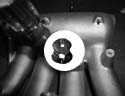
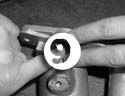
- Next are the sensors...
Swap over the IAT and IACV sensors. (PIC 6+7)
Then, apply the ITR throttle cable bracket. (PIC 8)
Lastly, swap over the rubber fuel injector grommets onto the Skunk2
manifold. (PIC 9)
|
|
|
| 6 |
[Throttle Pulley Swap]
- Now that you're
temporarily done fussing w/ either manifold, it's time for throttlebody
(TB) adventures!
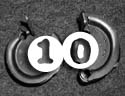
- I'm assuming you've
acquired a non-GSR throttle pulley. If you haven't done so, get
one! (PIC 10).
TIP: almost any 88-01 civic/integra (non-94-01
GSR TB) throttle pulley will work on the GSR TB.
- Use a 10mm socket
to remove the GSR TB pulley, and swap over the non-GSR TB pulley. You
*might* have to fiddle w/remounting the retensioning spring a bit, but
its not hard to figure out.
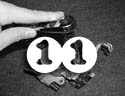
- Next, remove the
GSR throttle cable bracket thats on the TB, as well. (PIC 11).
- That was easy wasn't
it? (yes). If you'd like to, you can now mount the TB onto the Skunk2
manifold, reusing your GSR TB gasket (if you haven't fully damaged it).
- Now, go install
the Type-R throttle cable. It's pretty straight forward, so I'm not
including the how-to on this.
|
|
|
| 7 |
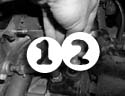
[Prepping the PCV Valve]
- Go back to your
engine bay, and take a look at the area where that bloody intake
manifold underside-bracket is.
You should see the factory oil catch can with 2 lines plugged into the
topside.
This is where the PCV valve lives. (PIC 12)
- Once you've pulled
out the PCV valve, get a lenghtly vaccum or coolant tube and attatch
to the PCV valve. Then plug the PCV valve back into its respective location
for test fitting. (PIC 13)
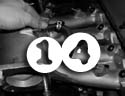
- Now, take the Skunk2
manifold, place it on the head, and fit the PCV tube up in between the
manifold's runners till it reaches the vaccum spout in the middle of
the plenum. (PIC 14).
|
| 8 |
[Finishing moves]
- Now that the PCV
valve is taken care of, check to see if all coolant lines can be put
back to their orginal location. If you're like me; I like to bypass
the coolant lines which run to the TB's fast idle valve (FIV).. Bypassing
the FIV is not a good idea if you live in a cold weather climate zone
though. Once you've overlooked your coolant routings, install the Skunk2
manifold.
- Tighten down all
of the 12mm flange nuts to a good snug or to factory tourque spec (that
is, if you can reach a torque wrench down into those tiiite spots).
- Apply the TB to
the Skunk2 manifold if you haven't yet.
- Fit the PCV valve
and coolant lines back to their respective location(s).
- Remember the fuel
rail +injectors? Well, it's time to re-install those. Use the 10mm nuts
to secure the fuel rail to the fuel rail posts, then connect the fuel
pressure regulator vaccuum tubing. NOTE: The brown ceramic spacers
that sandwich inbetween the fuel rail + manifold are not used on
some installs. To check this, make sure that there are no loose
gaps between the fuel injectors and fuel rail. If there is a gap and
the injectors sit rather loose, remove the spacers.
- Connect the throttle
cable's hammer-end into the throttle pulley; then mount the cable to
the throttle-cable bracket. Make sure you're getting full throttle too.
Have someone sit in the car while stepping on the throttle, look into
the TB and see if the brass butterfly inside the TB is opening all the
way, while you adjust the throttle-cable settings.
- Connect all of
the sensors to the engine harness (MAP, TPS, IAT, IACV, etc).
- TIGHTEN
DOWN THE 12mm FUEL PRESSURE RELEASE NUT ON TOP OF THE FUEL FILTER!
Don't forget that! (tighten snug or to torque spec)
- Re-tighten your
gas cap.
- Refill your radiator
either w/ your old coolant fluid or some new stuff.
- Double-check that
everything is A-OK/connected/lookin good/etc.
- If its all good,
get in your car and turn your ignition on (2 clicks of the key), but
don't turn the car over (idiot lights should be on). This will
build up fuel pressure. Now, go see if there's any fuel leaks or spray
coming from the fuel injectors/fuel rail/or fuel filter. There shouldn't
be any leaks if everything was back correctly. If there's no leaks,
so-far-so-good; go ahead turn the engine on now. It might take a couple
turns for it to kick over, so don't trip!
- Once running, check
for coolant leaks etc, if all looks good you're install is a success!
If you have any funky, high or irradic idle problems, double-check any
vacuum lines or any unplugged sensors.
Lower the car back down to the ground, go for a test drive, and clean
up yo' damn mess!
 |
[Additional Info Regarding ECU Tuning]
You should know that a Skunk2 manifold uses a single-butterfly
design and the GSR manifold uses a dual-butterfly design. Well, a stock
GSR (P72) ecu doesn't know that you changed over to a single butterfly
style intake manifold; and seeing that the Skunk2 manifold is essentially
a Type-R manifold, you'll need to adjust your ecu for this change, mainly
the VTEC crossover point (needs to raised). Here's your options:
- Option
1)
You can run your stock GSR ecu as-is, but it probably won't feel right
w/ the stock vtec crossover kicking on around 5000rpms so..
- Option
2)
Purchase a VTEC controller so you can move the VTEC point up
to about 5500-5700rpm or..
- Option 3)
If you have an OBD1 P72 ecu have it reprogrammed (by me!) w/ a customized
VTEC, redline, & fuel maps.
Although, if you go this route I suggest you upgrade your camshafts
to at least Type-R cams. Actually, you should upgrade
your camshafts anyways, to benefit even more from this Skunk2
manifold upgrade.
The end.
any questions/comments/hating/praising, email me at katman@ff-squad.com
|
|
|